Read this first!
It is recommended to install the GlideinWMS system using RPMs. GlideinWMS RPMs are distributed via Open Science Grid (OSG) and documented in the following pages:
- Instructions to install via RPM the Frontend and the related components (User Collector, Submit host, ...)
- Instructions to install via RPM the Factory and related components (Factory collector)
If you are installing GlideinWMS via RPM, you can ignore the reminder of this document. Check the Factory configuration and Frontend configuration for a more detailed reference about the configuration.
If your platform or your requirements do not allow for a RPM installation, read the remaining of this document to install GlideinWMS using the TAR Files distribution.
TAR Files Distribution Installation Process
Installation of GlideinWMS is a multi-step process and depending on your intended use, will require you installing several services. This document and all the linked install documents describe how to install and setup the GlideinWMS components using the TAR files distribution. To use the RPMs, see the links in the download page. The following must be installed in the correct sequence, follow the links for the details on how to install:
- Components and Pre-requisites and set up GSI certificates.
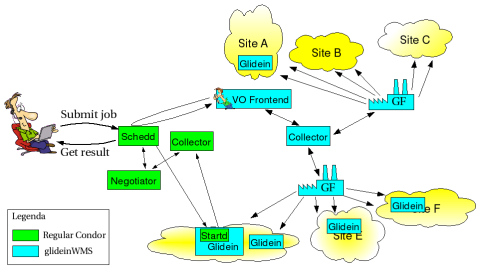
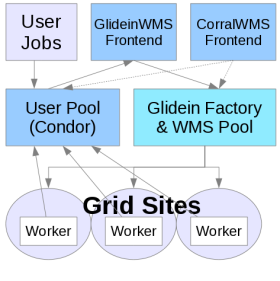
- The Glidein WMS Pool and colocated Glidein Factory node
- The User Pool node
- One or more scheduler nodes for user submission
- The Glidein Frontend
- Submitting a job
Services have dependencies between them. Prior to actually doing the install, it is suggested you use the configuration based installer, manage_glideins script, to validate the configuration on all nodes to resolve any errors affecting dependencies.
The configuration based installer does NOT modify any scripts that set a user environment upon log in, e.g.: .bashrc file, /etc/profile.d files, et al. Instead, an environment script is created for each service in its respective "home" location. If inclusion of these scripts is required at a location, it will need to be performed manually.For each of the GlideinsWMS services, the scripts for setting the environment are:
- wmscollector, usercollector, submit: condor_location/condor.sh
- Factory: install_location/factory.sh
- vofrontend: install_location/frontend.sh
For GlideinWMS services using HTCondor, the CONDOR_LOCATION/config.d directory will contain the HTCondor attributes required for that service.
If you are upgrading services already installed, please see here.
Possible Configurations
The following are recommended configurations for installing GlideinWMS. If you are installing a Factory, note that only configurations with the WMS Pool and Factory on the same node are supported. Also note that worker nodes must be able to access the web server on the Factory and Frontend nodes in order to download necessary files.
It should be noted that it is possible to install the GlideinWMS across administrative boundaries (i.e. you will only install part of the GlideinWMS infrastructure). See the OSG section below for an example.
Several possible configurations are:
Two Server configuration (recommended minimum):
- The GlideinWMS Pool and colocated glidein Factory node
- A node containing the Glidein Frontend, the glidein User Pool together with the scheduler for user submissions
Three Server configuration (recommended for 1000+ glideins)
- The glidein WMS Pool and colocated glidein Factory node
- A node containing the glidein User Pool together with the glidein Frontend
- A node containing the scheduler for user submissions
One Server configuration (Use only for test installs)
- The GlideinWMS Pool and colocated glidein Factory node, with the collector of the WMS Pool running on port 8618. Glidein Frontend, the glidein User Pool (collector running on default port 9618) together with the scheduler for user submissions. With this configuration, take special care of the ports assigned and of the condor.sh currently sourced when running commands.
Members of the Open Science Grid can use the OSG Factory at UCSD or GOC. In this case, they need to install only the following services:
See OSG Glidein Factory for more details on how to use this setup to talk to the OSG Factory. You will also need a proxy for the Frontend to communicate and (at least) one proxy for the glideins for submission.
OSG provides also an RPM to install the Glidein Frontend, the User Pool and scheduler. See the OSG GlideinWMS VO Frontend RPM installation guide for the RPM installation and configuration to use the OSG Factory. Note that the RPM installation by default installs all three these components.
RPM based installer
The Open Science Grid (OSG) maintains two sets of RPMs to install the GlideinWMS VO Frontend (mentioned above) and Factory. These RPMs install a default version of the system but with the option to manually edit settings for more complicated configurations. Instructions can be found here:
Configuration based installer (manage-glideins)
GlideinWMS is installed with a configuration file (ini format) based installer. All information needed by the services is listed in this file before installation, with a few exceptions. For example, the Factory entry details are still provided in a Q&A format during the installation process. You may also need to manually add configuration information after installation, just as you did with the Q&A version.
There are several advantages to this type of install. In addition to having all the details documented, it performs the actual installation faster and allows for re-installs more quickly. Since you have all the information in this file, you can also reproduce the same installation as needed.
As of v3.0, the Q&A installer is no longer supported. Installation is done through the manage_glideins script, located in GlideinWMS/install/, and uses the ini file described above. This script offers several additional features as well, see below for more information.
NOTE: If you get an error during installation or validation that requires a change to the ini file, it is recommended that you go back and re-install ALL services. You may affect one of the dependencies that will not be validated for the current node.
GlideinWMS ini configuration file
The ini file determines the installation and configuration of the various services. All ini file attributes are required. However, in several cases the value may be left empty. See the service-specific documentation for the details for each attribute.
The configuration based installer requires that the same ini file be used for all service installations. There are several areas where data is required from other services. Since most services can be installed on separate hosts, the installer can only validate data for the node being installed.
Default Section
The attributes in this section apply to all subsequent sections in the ini file unless they are overridden specifically in that section. So, if the location/value of any option varies from host to host, you will need to override them in that section of the ini file.
Pacman options
The 2 pacman related attributes are in the Default section and were used to download and install the OSG/VDT client software and CA certificates with Pacman. This is obsolete, please:
- leave these options empty: these are still required but should contain no value.
- set the vdt_location option if you install OSG Client using the tarball distribution. Set itempty if you install OSG Client using the RPM (system install).
- the install_vdt_client attribute should be set to 'n'.
Service options
The GlideinWMS system provides five different services, each one with a section in the ini file: WMSCollector, Factory, VOFrontend, UserCollector, Submit (host). All service attributes are described in their respective install pages. Each page, e.g. the VO Frontend installation page describes what is required for installing and validating that service.
Here you can find some example configuration files.
The manage-glideins script
This script is used to install and manage the GlideinWMS services. It is located in glideinWMS/install/manage-glideins and can be invoked in different ways.
./manage-glideins --ACTION SERVICE --ini INIFILE [--ssh [user]] [--debug]
This invocation can be used to install, start, stop or check the status of the glidein services based on the configuration in the specified ini file.
ACTION can be one of:
- validate: Allows you to validate the ini file prior to installation
- install: Install the service
- configure: This allows you to reconfigure your service based on changes to the ini file without re-installing HTCondor.
For services using HTCondor, it will update the config.d local config files,
For the Factory and VO Frontend, it will update the respective xml config files. - start: Starts the service. Remote starting of services is possible if remote access (via ssh) is allowed.
- stop: Stops the service. Remote stopping of services is possible if remote access (via ssh) is allowed.
- status: Returns the status of the service. Remote starting of services is possible if remote access (via ssh) is allowed.
SERVICE can be one of:
- wmscollector
- usercollector
- Factory
- submit
- vofrontend
- rpm (Used for OSG Frontend RPM sites. Note: The 'install' action is not allowed for this service.)
- all: can only be used with start/stop/status actions
--ssh: Allows the start/stop/status actions to be performed remotely providing the user has valid access to the other service's node via 'ssh -l' using the service's username. The '--ssh' option will use the ini file specified username attribute unless an optional 'user' is specified.
--debug: When used with start/stop/status actions, it will display the series of commands used.
./manage-glideins --install-node --ini INIFILEThis invocation allows you to install all services configured for the node where you are running the script. There are some limitation to this.
./manage-glideins --create-entries --ini INIFILEThis invocation can be used to select new glidein entry points after the initial installation of a Factory service. It will walk you through the same question and answer process querying ReSS and allowing for manual entries. It will then create a file containing the entry elements for the elements you selected. This can then be merged with the existing Factory configuration file and a reconfiguration performed to update those elements.
./manage-glideins --create-group --ini INIFILEThis invocation can be used to select new group selection criteria after the initial installation of a Frontend service. It will walk you through the same question and answer process as during the installation. It will then create a file containing the group element for the criteria selected. This can then be merged with the existing Frontend configuration file and a reconfiguration performed.
./manage-glideins --show-ini INIFILEThis invocation allows you to view the ini file options/values. It substitutes the variables and is especially useful when the DEFAULT section is used to apply values to all sections/services.
./manage-glideins --create-template SERVICEThis invocation allows you to create an ini file template for installing a single service. It contains all the required attributes for that service. It should be understood that many of the cross-validations that would normally insure a working installation are bypassed since those validations are normally performed on the node for those services.
Additional Documents:
- Component Installation: Installation tips for other software needed by the GlideinWMS, such as HTTP, OSG Client, JavascriptRRD, etc. NOTE: If you install using the RPMs, the process will take care of the dependencies.
- Quick Reference Guide to GSI Authentication Setup in GlideinWMS: for information on how to configure the GSI security, and additional GSI configuration.
- Multiple Schedds for increased scalability.
- Troubleshooting Frontend installation problems and Troubleshooting Factory installation problems.
- Frequently Asked Questions for advanced configuration tips.