WMS Factory
WMS Pool and Factory Installation
1. Description
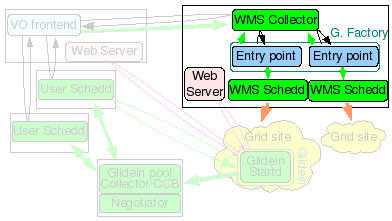
 The glidein Factory node will be the
HTCondor Central Manager
for the WMS, i.e. it will run the HTCondor Collector and Negotiator
daemons, but it will also act as a
HTCondor Submit node
for the glidein Factory, running HTCondor schedds used for Grid
submission.
On top of that, this node also hosts the Glidein Factory daemons. The Glidein Factory is also responsible for the base configuration of the glideins (although part of the configuration comes from the Glidein Frontend).
Note: The WMS Pool collector and Factory must be installed on the same node.
2. Hardware requirements
| Installation Size | CPUs | Memory | Disk |
| Small | 1 | 1GB | ~10GB |
| Large | 4 - 8 | 2GB - 4GB | 100+GB |
 A major installation, serving tens of sites and several thousand
glideins will require
several CPUs (recommended 4-8: 1 for the HTCondor
damons, 1-2 for the glidein Factory daemons and 2 or more for
HTCondor-G schedds) and a reasonable amount of memory (at least
2GB, 4GB for a large installation to provide some disk
caching).
The disk needed is for binaries, config files, log files and Web monitoring data (For just a few sites, 10GB could be enough, larger installations will need 100+GB to maintain a reasonable history). Monitoring can be pretty I/O intensive when serving many sites, so get the fastest disk you can afford, or consider setting up a RAMDISK.
It must must be on the public internet, with at least one port open to the world; all worker nodes will load data from this node trough HTTP. Note that worker nodes will also need outbound access in order to access this HTTP port.
3. Downtime handling
The glidein Factory supports the dynamic handling of downtimes at the Factory, entry, and security class level.
Downtimes are useful when one or more Grid sites are known to have
issues (can be anything from scheduled maintenance to a storage
element corrupting user files).
In this case the Factory
administrator can temporarily stop submitting glideins to the affected
sites, without stopping the Factory as a whole. The list of current
downtimes are listed in the Factory file in
glideinWMS.downtimes
Downtimes are handled with
gwms-factory up|down -entry 'factory'|<entry name> [-delay <delay>]
Caution: An admin can handle downtimes from Factory, entry, and
security class levels.
Please be aware that both will be used.
More advanced configuration can be done with the following script:
manageFactoryDowntimes.py -dir factory_dir -entry ['all'|'factory'|'entries'|entry_name] -cmd [command] [options]
You must specify the above options for the Factory directory, the entry you wish to disable/enable, and the command to run. The valid commands are:
- add - Add a scheduled downtime period
- down - Put the Factory down now(+delay)
- up - Get the Factory back up now(+delay)
- check - Report if the Factory is in downtime now(+delay)
- vacuum - Remove all expired downtime info
Additional options that can be given based on the command above are:
- -start [[[YYYY-]MM-]DD-]HH:MM[:SS] (start time for adding a downtime)
- -end [[[YYYY-]MM-]DD-]HH:MM[:SS] (end time for adding a downtime)
- -delay [HHh][MMm][SS[s]] (delay a downtime for down, up, and check cmds)
-
-security SECURITY_CLASS (restricts a downtime to users of that
security class)
(If not specified, the downtime is for all users.) - -comment "Comment here" (user comment for the downtime. Not used by WMS.)
This script can allow you to have more control over managing downtimes, by allowing you to make downtimes specific to security classes, and adding comments to the downtimes file.
Please note that the date format is currently very specific. You need to specify dates in the format "YYYY-MM-DD-HH:MM:SS", such as "2011-11-28:23:01:00."
4. Testing with a local glidein
In case of problems, you may want to test a glidein by hand.
Move to the glidein directory and run
./local_start.sh entry_name fast -- GLIDEIN_Collector yourhost.dot,your.dot,domain
This will start a glidein on the local machine and pointing to the yourhost.your.domain collector.
Please make sure you have a valid Grid environment set up, including a valid proxy, as the glidein needs it in order to work.
5. Verification
Verify that HTCondor processes are running by:
ps -ef | grep condor
You should see several condor_master and condor_procd processes. You should also be able to see one schedd process for each secondary schedd you specified in the install.
Verify GlideinWMS processes are running by:
ps -ef | grep factory_username
You should see also a main Factory process as well as a process for each entry.
You can query the WMS collector by (use .csh if using c shell):
$ source /path/to/condor/location/condor.sh
$ condor_q
$ condor_q -global
$ condor_status -any
The condor_q command queries any jobs by schedd in the WMS pool
(-global is needed to show grid jobs).
The condor_status will show all daemons and glidein classads in the
condor pool. Eventually, there will be glidefactory classads for each
entry, glideclient classads for each client and credential, and
glidefactoryclient classads for each entry-client relationship. The
glideclient and glidefactoryclient classads will not show up unless a
Frontend is able to communicate with the WMS Collector.
MyType               TargetType           Name

glidefactory         None                 FNAL_FERMIGRID_ITB@v1_0@mySite
glidefactoryclient   None                 FNAL_FERMIGRID_ITB@v1_0@mySite
glideclient          None                 FNAL_FERMIGRID_ITB@v1_0@mySite
Scheduler            None                 xxxx.fnal.gov
DaemonMaster         None                 xxxx.fnal.gov
Negotiator           None                 xxxx.fnal.gov
Scheduler            None                 schedd_glideins1@xxxx.fna
DaemonMaster         None                 schedd_glideins1@xxxx.fna
Scheduler            None                 schedd_glideins2@xxxx.fna
DaemonMaster         None                 schedd_glideins2@xxxx.fna