1. Description
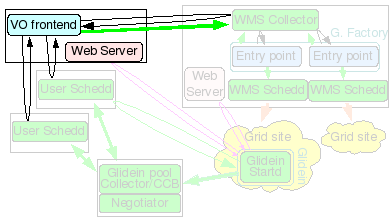
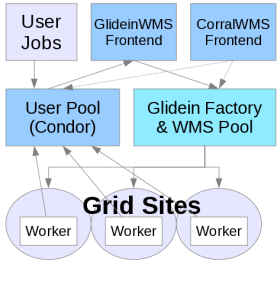
The Glidein Frontend (or VO frontend) will match user jobs with Glidein Factory ads. It is responsible for the submission of new glideins.
The VO frontend also keeps part of the configuration of a glidein, and can also provide the glidein Factory with the pilot proxies.
Note: if you are installing only the frontend and planning to connect to the OSG factory, please refer to this section: Connecting to OSG Factory
Note: This document refers to the tarball distribution of the Glidein Frontend. If you want to install or installed via RPM please refer to the OSG RMP Guide.
2. Hardware requirements
| CPUs | Memory | Disk |
| 1 | 1GB | ~20GB |
This machine needs a fast CPU and a moderate amount of memory (1GB should be enough).
The disk needed is just for binaries, config files and log files (20GB should be enough)
3. Needed software
See the prerequisites page for a list of software requirements.
4. Before you begin...
4.1 Required Users
The installer requires a non-privileged user. This should be created prior to running the GlideinWMS installer.
| User | Notes |
| VO Frontend User | The Glidein Frontend should be installed as a non-privilged user. Note: It is recommended that you install HTCondor as this user as well. |
4.2 Required Certificates/Proxies
The installer will ask for several DNs for GSI authentication. You have the option of using a service certificate or a proxy. These should be created and put in place before running the installer. The following is a list of DNs the installer will ask for:
- WMS Pool (Collector) cert/proxy DN
- User Pool (Collector) cert/proxy DN
- User Submitter cert/proxy DN
- Glidein Frontend HTCondor proxy DN (cannot use a cert here)
Note 2: The installer will ask if these are trusted HTCondor Daemons. Answer 'y'.
4.3 Required Directories
When installing the Glidein Frontend you will need to specify the directory location for various items. We recommend putting most of them in /var. All the directories in /var have to be created as root. Therefore, if you intend on using /var, you will have to create the directories ahead of time.
Note: The Web data must be stored in a directory served by the HTTP Server.
4.4 Miscellaneous Notes
You will need the OSG Client (formerly VDT client). You need to install it yourself using either the RPM or the tarball provided by OSG (see here).
If you installed OSG Client using the RPM, the binaries will be in the system path. If you installed it using the tarball, then answer 'y' when asked if you want OSG_VDT_BASE defined globally. Unless you want to force your users to find and hard code the location.
By default, match authentication will be used. If you have a reason not to use it, be sure to set to False the USE_MATCH_AUTH attribute in both the Factory and Frontend configuration files.
5. HTCondor installation instructions
The Glidein Frontend will need the the HTCondor binaries. You can reuse an existing installation, if available, like if you host the Glidein Frontend on the a submitter node or on a submitter node.
The installer can install a local copy as the same non privileged Glidein Frontend user. The whole process is managed by a install script described below.
6. Glidein Frontend installation
The Glidein Frontend needs a x509 proxy to communicate with the glidein Factory. You need to create such proxy before starting a VO
Frontend and then keep it valid for the life of the frontend. If used for glidein submission (i.e. if it is passed to the glidein
Factory), this proxy must at any point in time have a validity of at least the longest expected job being run by the GlideinWMS
(and not less than 12 hours).
How you keep this proxy valid (via MyProxy, kx509, voms-proxy-init from a local certificate, scp from other nodes, or other methods),
is beyond the scope of this document.
The VO frontend can also host the x509 proxies used for glidein submission. If you do use this (recommended) method, you need to keep these proxies valid at all times, as you do for the main frontend proxy.
The Glidein Frontend should be installed as a non privileged user. The provided installer will create the configuration file, although some manual tunning will probably be needed.
Before starting the installation of the Glidein Frontend make sure that the WMS Collector is started and running. The user collector and schedds should also be running.
Move into
glideinWMS/install
And execute the following. The installation of the frontend should be done as the frontend user (see username below).
./manage-glideins --install vofrontend --ini glideinWMS.ini
| Attribute | Example | Description | Comments |
| install_type | tarball or rpm |
If this is a VOFrontend RPM installation and you are doing a
'--configure', then rpm should be specified. If this is a stand-alone VOFrontend install, only tarball installations are supported. |
Valid values: tarball, rpm. |
| hostname | vofrontend.domain.name | hostname for VOFrontend. | . |
| username | vofrontend (non-root account) | UNIX user account that this services will run under. DO NOT use "root". | For security purposes, this value should always be a non-root user. |
| service_name | vo_frontend | Used as the 'nickname' for the GSI DN in the condor_mapfile. | This name MUST correspond to frontend service name listed the factory configuration for the frontend to be able to talk to the factory. |
| install_location | /path/to/vofrontend | HOME directory for the frontend software. |
When the frontend is created the following files/directories will
exist in this directory: * frontend.sh - environment script * frontend_[instance_name].cfg - directory containing the frontend configuration file * frontend_[instance_name] - directory containing the frontend files The install script will create this directory if it does exist. |
| logs_dir | /path/to/vofrontend/logs | User settable location for all Frontend log files. |
Beneath this location there will be multiple sets of logs:
* for the frontend as a whole
* for each group the frontend utilizes
The install script will create this directory if it does exist. |
| instance_name | v2_5 | Used in naming files and directories. | . |
| condor_location | /path/to/condor-submit | Directory in which the condor software will be installed. |
Note: The Frontend never runs any HTCondor daemons.
It only uses the HTCondor client tools. IMPORTANT: The Frontend can share the same instance of Condor as the User Collector and /or Submit. The condor_location must not be a subdirectory of the Frontend's install_location or logs_dir. They may share the same parent, however. |
| condor_tarball | /path/to/condor/tarballs/condor-7.5.0-linux-x86-rhel3-dynamic.tar.gz | Location of the condor tarball. | The installation script will perform the installation of condor using this tarball. It must be a zipped tarball with a *.tg.tz name. |
| condor_admin_email | whomever@email.com | The email address to get Condor notifications in the event of a problem. | Used in the condor_config.local only. |
| x509_cert_dir | /path/to/certificates-location | The directory where the CA certificates are maintained. | The installer will validate for the precesence of *.0 and *.r0 files. If the CAs are installed from the VDT distribution, this will be the VDT_LOCATION/globus/TRUSTED_CA directory. |
| x509_proxy | /path-to-proxy/x509_proxyfile | The location of the proxy used to identify this service to the other glideinWMS services. | This is the only glideinWMS service that currently requires a proxy to communicate with the other glideinWMS services. This is NOT the glidein pilot proxy. The x509_gsi_dn option that follows should be populated with the issuer of this proxy. |
| x509_gsi_dn | dn-issuer-of-x509_proxy-using-openssl | This is the identity used by this service to contact the other Condor based glideinWMS services. |
This is the issuer of the proxy identified by the
x509_proxy option above.
openssl x509 -issuer -noout -in [x509_proxy]It is used to populate the condor_config file GSI_DAEMON_NAME and condor_mapfile entries of this and the other glideinWMS services as needed. |
| glidein_proxy_files | /path-to-proxy/proxyfile1 | Identifies the proxy(s) to be used to submit the glidein pilot jobs. |
The Factory is expecting the VOFrontend to provide the glidein pilot
proxies, at least one proxy must be specified. When specifying multiple proxies, whitespace is the delimiter. |
| glidein_proxy_dns | dn-issuer-of-glidein_proxy_files-using-openssl | Identifies the issuer(s) of each proxy specified in the glidein_proxy_files option. |
This is the issuer of the proxy.
(x509_cert option).
openssl x509 -issuer -noout -in [glidein_proxy_files]Validation is performed based on the relative position of each entry in those options. This is used in the UserCollector condor_mapfile and condor_config.local so the glidein pilot can communicate with the UserCollector. When mulitple proxies are specified, a semicolon is the delimiter. |
| glexec_use | optional | Tells the Factory service if use of the glexec authorization process is to be considered in selecting entry points to submit glidein pilots for the frontend user jobs.. | Valid values: * required - will only request glidein pilots to entry points that use glexec * optional - will request glidein pilots regardless of glexec use * never - will never request glidein pilots for entry points using glexec |
| expose_grid_env | True | Tells the Factory service to export shell variables from the glidein pilots to the user jobs or not. | Valid values: * True - jobs will export shell variables to the user job running. * False - no shell variables will be exported. |
| group_name | main | This defines a grouping for user jobs that you wish to monitor using a specified critera. | The criteria used is defined by the match_string and userjob_constraints options that follow. |
| userjob_constraints | , | This represents the criteria used for matching glideins to jobs. | This is a Condor expression. A simple expression would be:
(JobUniverse==5)&&(GLIDEIN_Is_Monitor =!= TRUE)&&(JOB_Is_Monitor =!= TRUE) |
| match_string | True | This is the selection and matching criteria used for the user jobs. |
This must be in python format so using the exact case (True and False must be capitalized) is critical. One example is:glidein["attrs"]["GLIDEIN_Site"] in job["DESIRED_Sites"].split(",")To select all jobs, just use 'True'. If you use other that 'True', the criteria will need to specified in your user's condor job statement. |
| install_vdt_client | n | This should be set as n - so the installler will not attempt to install the OSG Client You must pre-install OSG Client |
Choose 'n'. |
| vdt_location | /path/to/glidein/vdt | The location of the OSG/VDT client software. | Leave this blank, since the install_vdt_client option should always be 'n' |
| glideinwms_location | /path/to/glideinWMS_code | Directory of the glideinWMS software. | This software is used for both the installation and during the actual running of this glidein service. |
| web_location | /var/www/html/factory |
Specifies the location for the monitoring and staging data that must
be accessible by web services. The installer will create the
following directories in this location: 1. web_location/monitor 2. web_location/stage |
Important: This should be created before installing this service as the service's username and the web server user are generally different. This script will not be able to create this directory with proper ownership. |
| web_url | http://%(hostname)s:port | Identifies the url used by the glidein pilots to download
necessary software and to record monitoring data. In order to insure consistency, the installer will take the unix basename of the web_location and append it to the web_url value. So, for the value shown below in the web_location, the actual value used by the glidein pilots, will be web_url/factory/stage(monitor). |
Important: It may be a good idea to verify that the port specified is accessible from off-site as some sites restrict off-site access to some ports. |
| javascriptrrd_location | /path/to/javascriptrrd | Identifies the location of the javascript rrd software. | This installation must include the flot processes in the parent directory. |
For example configuration files, see here.
6.1. Starting the Glidein Frontend
Use the startup script:
cd <install dir>
./frontend_startup start
The same script can be used to stop, reconfig and restart the Glidein Frontend.
Note: If you installed the frontend via RPM some files or commands will differ. Please refer to the OSG RMP Guide.
6.2. Reconfiguring the Glidein Frontend
The files in the frontend working directory must never be changed by hand after the directory structure has been created.
The proper procedure to update the frontend configuration is to make a copy of the official configuration file (i.e. frontend.xml) as a backup. Then edit the config file and run
<frontend working directory>/frontend_startup reconfig config_copy_fname
This will update the directory tree and restart the frontend and group dameons. (If the frontend wasn't running at the time of reconfig it will only update the directory tree.)
Please notice that if you make any errors in the new configuration file, the reconfig script will throw an error and do nothing. If you executed the reconfig command while the frontend was running, it will revert to the last config file and restart with those settings. As long as you use this tool, you should never corrupt the installation tree.
The frontend_startup script contains a default location for the frontend configuration and is set to the location used for the initial install. This allows you to not have to specify the config location when doing a reconfig. To change the default location in the file, run the command:
<frontend working directory>/frontend_startup reconfig config_copy_fname update_default_cfg
NOTE: The reconfig tool does not kill the frontend in case of errors. It is also recommended that you disable any groups that will not be used. Never remove them from the config file.
6.3 Downtime handling
The glidein frontend supports the dynamic handling of downtimes.
You(frontend admins) should add the following attribute for the frontend tag in frontend.xml manually:
<frontend downtimes_file="frontenddowntime"
Downtimes are handled with
service gwms-frontend up|down|statusdown [-delay <delay>]
More advanced configuration can be done with the following script:
/usr/sbin/manageFrontendDowntimes.py -dir /var/lib/gwms-frontend/vofrontend -cmd [command] [options]
You must specify the command to run. The valid commands are:
- add - Add a scheduled downtime period
- down - Put the frontend down now(+delay)
- up - Get the frontend back up now(+delay)
- check - Report if the frontend is in downtime now(+delay)
Additional options that can be given based on the command above are:
- -start [[[YYYY-]MM-]DD-]HH:MM[:SS] (start time for adding a downtime)
- -end [[[YYYY-]MM-]DD-]HH:MM[:SS] (end time for adding a downtime)
- -delay [HHh][MMm][SS[s]] (delay a downtime for down, up, and check cmds)
This script can allow you to have more control over managing downtimes.
Please note that the date format is currently very specific. You need to specify dates in the format "YYYY-MM-DD-HH:MM:SS", such as "2011-11-28:23:01:00."